Integrate VAddy with your CI tools for robust security checks, automatically
If you have Continuous Integration in place, it’s a great idea to add in some security checks to the pipeline. We all know about the threat that hacks and data breaches pose for every business. According to a 2017 survey by HSB, over half of all US businesses have been hacked. There’s no easier way to lose the confidence of your users and clients than suffering a hack!
So, in this post, I’ll share an easy way to use VAddy for automating the following security tests with this tool that works in their Cloud:
- XSS
- SQL Injection
- Remote File Inclusion
- Directory Traversal
- Command Injection
Why VAddy?
According to its website, VAddy helps developers to code securely and find vulnerabilities in new features while preventing teams from running security scans at the last minute and identify bad coding trends. It’s useful because it’s compatible with all languages, integrates easily with CI tools like Jenkins and TravisCI, and performs security checks and audits automatically on every build.
So, let’s dive in!
Note: if you want to get more details on how to use VAddy, check the documentation. What we want to share here is a brief introduction to let you get an idea of how easy it is to integrate the tool into your pipeline.
Setting Up VAddy
Once you create a VAddy account, you’ll need to declare the application that you want to test. To do so, you need to add a new server inside the VAddy administration console. Once that’s done, you have to verify that you own this server so that not just anyone can scan your site. For this, VAddy provides a verification file that must be added to the web root of the web application that you want to scan. Then, if you enter your administration console, you can see that the server is now verified.

Once you have the server verified, you need to define what you want to scan inside the server. First of all, you must define if you want to do a full scan of the site or if you want to check only some resources. For this, there is a section in VAddy called Proxy Crawling where it can be done.
There are two ways to define the URL set to be scanned:
Full Scan
1. Configure your browser to use the following proxy: 54.92.84.100:10080.
2. After that, you can see the instructions in the following screen, where it indicates the URL to start crawling.
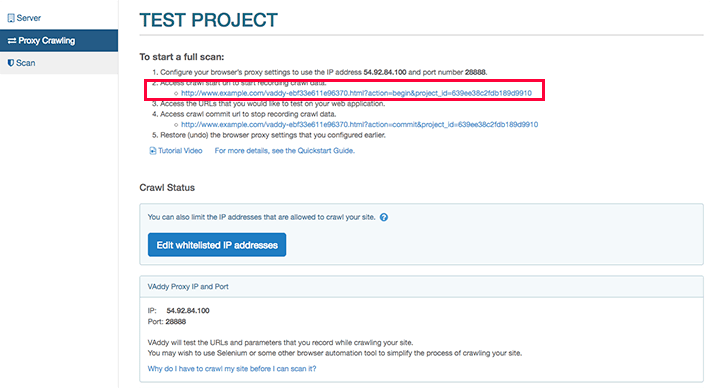
3. Access the URLs that you want to test from your site, for example: http://open-cart.azurewebsites.net
4. Go to the URL to stop recording the “Crawl Data” that is shown in the image above.
Simple Scan
VAddy allows you to manually enter up to 3 user-defined URLs from its interface, as shown here:

After you define the URLs to test, records will be generated in VAddy with the defined set of URLs (Crawl Data) by either of those two methods.

To run the site scan from the VAddy interface, you must indicate the Crawl ID on which you want to test. Optionally, you can indicate a label so that you don’t have to remember which ID is related to which set of URLs.
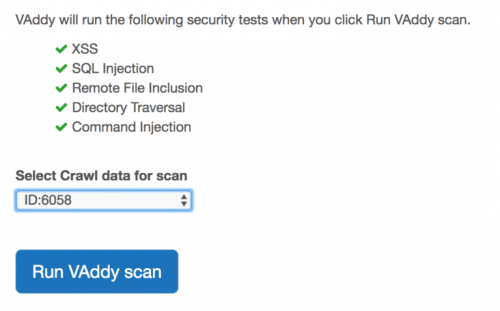
VAddy will run the automated tests and once they’re done, inside the console you can see which tests passed the security check and which did not.

Integrating VAddy with Travis CI
To be able to integrate it with Travis-CI, the first step is to generate an API Key, which is done from the VAddy interface from the menu option User -> WebAPI. Then, you must copy the repository of the VAddy API (https://github.com/vaddy/vaddy-api-ruby) to the GitHub associated with Travis and create the following files:
- Rakefile
- Gemfile
- Travis.yml
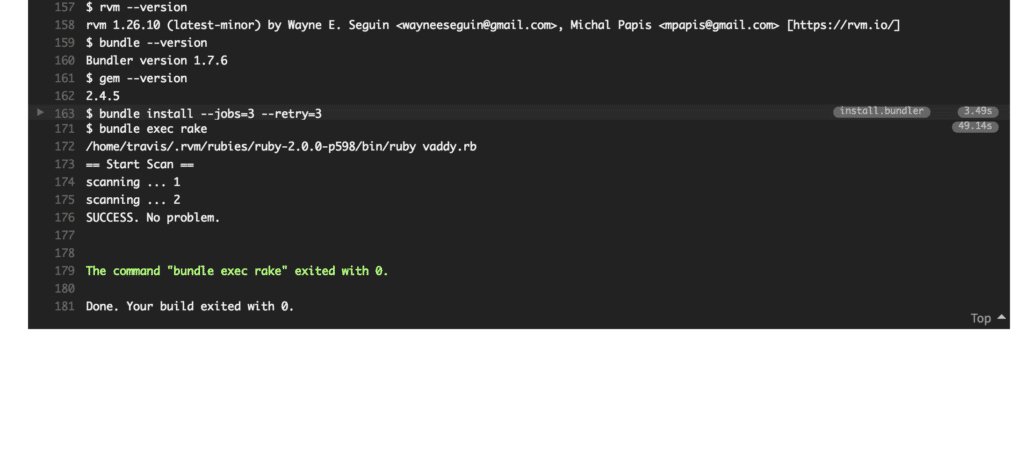
In these files, it will be indicated which gems are necessary to run the API (since it is made in Ruby code) and which .rb file will execute the scan.
After this step, the following environment variables must be created in Travis, accessing the VAddy repository settings from Travis:

- VADDY_CRAWL_ID = ID or label of the set of URLs to be scanned, this parameter is optional, if it is not indicated, the last defined Crawl ID will be used.
- VADDY_HOST = URL of the server to be scanned.
- VADDY_TOKEN = APIKey generated previously.
- VADDY_USER = VAddy user.
There you have it! Performing all the steps above should be enough for the correct execution of the scan from Travis CI.
 Have you used VAddy before for security tests in continuous integration?
Recommended for You
How to Easily Do Accessibility Testing in Continuous Integration
3 Challenges to Effective Performance Testing in Continuous Integration

Selenium Security Testing: OWASP ZAP Integration
How can we test possible security vulnerabilities of a website while running automated functional tests? Is my software functional if it has a security issue? In this article, we detail how to integrate Selenium and OWASP ZAP to achieve efficient and quality security testing with…

7 Security Testing Tools to Try Now
It’s never too soon to assess the security of your application with these great penetration testing tools Remember the Equifax breach in 2017 which affected nearly one in three Americans? Or the 2018 Marriott breach that compromised 500 million accounts in its database? It’s very…
