How to add accessibility tests to your CI pipeline using the open source tool, Pa11y
If you are unfamiliar with continuous integration (CI), it’s a practice wherein each developer’s code is merged frequently (at least once per day). In this way, a stable code repository is maintained from which anyone can start working on a change. The build is automated with various automatic checks, such as code quality reviews, execution of unit tests, etc.
Of the tests that can be run in a continuous integration environment, we will be looking at accessibility tests. Accessibility testing, according to Guru99, is a subset of usability testing, and it’s performed to ensure that the application being tested is usable by people with disabilities like the deaf, blind, and color blind as well as other disadvantaged groups.
To perform accessibility tests, you can use the open source tool, Pa11y which lets you know if an application meets certain accessibility standards or not. At the same time, Pa11y allows a simple integration with CI engines like Circle-CI, Jenkins or Travis-CI, which is why it’s a natural choice.
![]()
There are different versions of the tool with which you can work: by command line, by a web service, and others. For this particular example, we’ll use the console version.
It’s important to mention that for the proper functioning of Pa11y, you must have installed Node.js 4+ and PhantomJS. Then it is installed by command line very simply, with the following command:
npm install -g pa11y
To use pa11y, use this command:
pa11y [options] <url>
The options field allows you to customize the type of testing that is going to be carried out in many ways. Among the parameters that can be specified, the main ones are:
- -s, -standard <name>: The accessibility standard is selected with which the test will be carried out. By default, it uses WCAG2AA. Other options include: Section508, WCAG2A, WCAG2AAA.
- -r, -reporter <reporter>: Refers to how the results obtained are returned. If this option is not included, the results are displayed by console. The available format options include: cli, csv, tsv, html and json.
- – l, -level <level>: The message level with which it fails (error, warning, notice).
- -i, -ignore <ignore>: Allows you to specify certain things that you want to ignore. For example, warning messages may be ignored, or a certain principle of the standard may be ignored for some reason.
- -T, -threshold <number>: Number of errors, warnings, or notices allowed without making the test fail.
There are many more configurations that you can have, which can be found on the tool’s website. To do some basic testing (without any particular configuration, taking the ones that come by default), you can use this command:
pa11y http://myexamplepage.com
If you want your testing to be more stringent, following the WCAG2AAA standard, use this command:
pa11y –standard WCAG2AAA http://myexamplepage.com
If you also want the results to be saved in a file (csv) to later consult them:
pa11y –reporter csv http://myexamplepage.com > myresults.tsv
If you want to allow 10 errors without the test failing:
pa11y –threshold 10 –reporter csv http://myexamplepage.com > misresultados.tsv
Regarding the exit codes, pa11y has three:
- 0: Pa11y was executed successfully, and there are no errors.
- 1: Pa11y failed due to technical failure.
- 2: Pa11y ran successfully but there are errors on the page.
For example, I ran the command this way from my Travis-CI (configuring the command in the .travis.yml file):
pa11y –threshold 30 open-cart.azurewebsites.net -s WCAG2AA
In this example, I set a threshold of 30 errors. Therefore, the test only fails if the page being tested has more than 30 errors. Although the test doesn’t fail if it has fewer errors, you can see them all in detail in the execution of Travis-CI in the output of the build. The WCGAA standard was used.
Here’s an example of the detail of the errors obtained:

This error indicates that the contrast of colors on the page is not adequate. However, by the threshold that I set, the test didn’t fail.
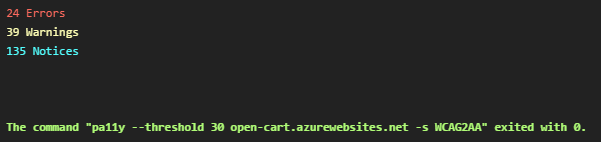
The test ends with exit code 0, which indicates that it was executed successfully and there were no errors (above the threshold I set).
For more options, check these guides: https://github.com/pa11y/pa11y-ci
And there you have it, this is how you can easily add accessibility tests into your CI pipeline, considering the special needs your users may have to make your product accessible to a wider and more diverse user base!
Have you tried this or something more advanced? Let me know how it went!
Recommended Posts
[Infographic] What is Mobile Accessibility and Why is it Important?
How to Use Monkop for Continuous Mobile Testing