Looking to hear what other testers think about Testim? Look no further.
When it comes to finding the most adequate tools for testing a software application, our team generally leans toward the use of open source tools for many reasons. First, they’re excellent for integrating with many platforms. Secondly, they generally offer a large community from which you can get support and lastly, they provide flexibility to the point that you can extend them on your own in a cost-effective way. But, in this post and in this case, you’ll see we’re about to make an exception!
Our team was introduced not long ago to Testim while we were searching for a way to minimize the time spent on script maintenance and overall, find a way to generate reliable scripts without having to be a programmer.
In this post, we’re going to share our evaluation of Testim after having spent some time investigating it on our own and after getting to know the people behind it a bit more (Thanks to the Testim team for all of your support and to Nicolas Reina for helping with this review!).
What is Testim?
Testim is a commercial end-to-end software testing tool powered with AI that provides developers and testers a fast way to automate functional tests. It’s a web-based platform that also helps teams to follow good software quality practices.
Testim also has some plugins to integrate your tests into a CI/CD Jenkins pipeline, Jira, and personalized grids for execution.
Additionally, the tool has a sleek and complete UI and it easily adapts to your way of working, with the option to use either its coded or code-less version (for those that are just starting out with automation).
AI Smart Locators
When creating a test, a common and valid way to speed up the authoring of the scripts is to record actions on the system under test with a tool, but the vast majority of these tools do not determine the best locators over the page. Consequently, if you don’t have the technical skills to deal with this issue, you’re certain to end up with many imminent problems on the maintenance side.
Nevertheless, the Testim recorder identifies the accurate locators for each element with the help of Artificial Intelligence, generating a list of rankings for different locators based on best automation practices for creating stable tests.
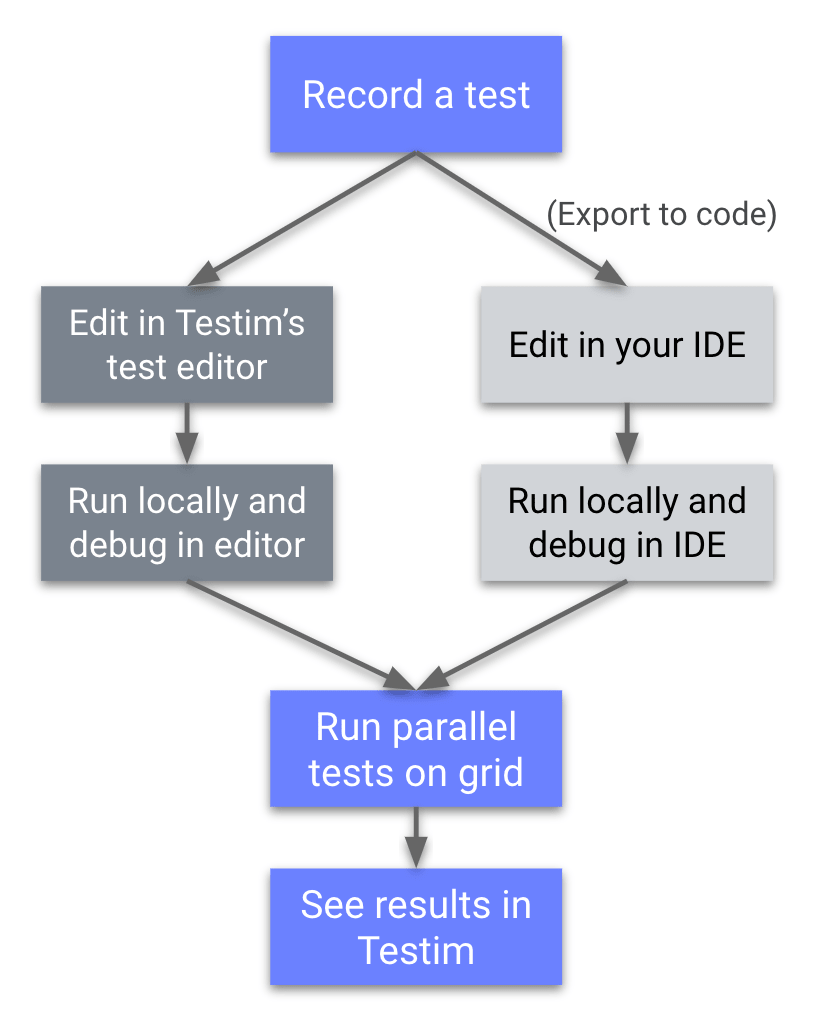
Once signed into the Testim platform, you can move forward with creating a test just by installing the Testim Extension for Chrome and then by clicking the button, “Create New” at “Test List” > “New Test” on the right corner of the page.
Once it’s properly installed, you can start recording by pressing the red button in the toolbar, then a dialog screen will appear requesting the main page of the site for testing.
When you’re done, the test shows the recorded steps in the Editor.
For each step, there are several edit options to customize the behavior of the test, with the option to edit the locators, assertions, actions in the properties options, and more.
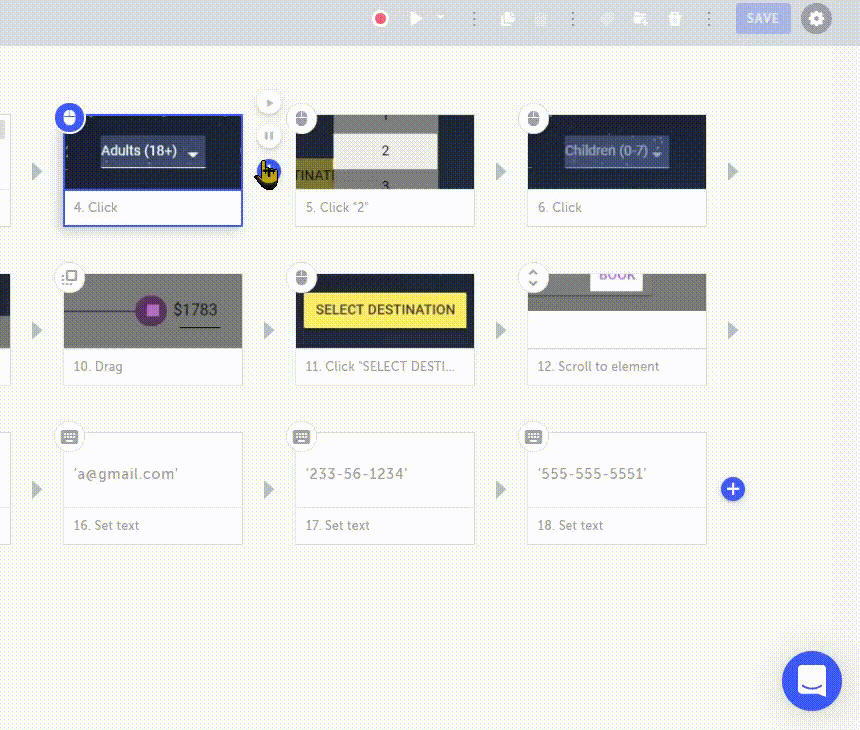
As you can see, Testim has the ability to choose the recommended locators for you, but if for some reason you aren’t happy with them, you can either change the priority of the ranking or just make a custom one.
To run the test, just press the “Play” button in the toolbar and as the execution ends, the result will be displayed in the editor indicating whether the test passed or failed.
Single API and UI Testing Framework
Something that isn’t common for this type of web-based tool is the possibility to integrate API testing into the web automation test suite. Yet, Testim provides a really user-friendly way to make HTTP requests. This means that in a few simple steps, you can fetch values from an API call and validate the correlating value from the front end in the same test. Also, a complete suite of API testing can be developed with this feature which is really great if you want to have it all in one place.
To see this more clearly, let’s check out an example. Below there’s a brief description of the steps for our API tests. As I mentioned before, the first thing is to create a new test, then do the following:
- Set the base URL
- Click the “+” icon, then the “Actions” option (or you can also search for it in the dropdown menu called “ALL”) and then choose the “Add API action” option.
- Next, set the fields that are presented within the recently configured action:
- Method: Testim has the option to use the following HTTP Method requests:
- Get / Post / Put / Patch / Delete / Copy / Head / Options)
- URL: The URL to which you want to send a request
- Headers: These are the key values that you want to send to your API (this action can be done in line format or in text format (for this, you must click on the “Raw” switch).
- Body: This is where you select the structure of your request
- There’s one more thing to set before sending the request. To the right of the screen, you can check and uncheck an option that says “Send via web page.” This is if you want to send the API call outside the browser context, so all browser-restrictions do not apply to it.
- Note: Testim allows parameters through:
- The url with “?parameterName=<<value>>”.
- The raw format at the right of the screen.
- The request body, “variableName”={{parameter}}.
- Import of a parameter from another previous step
You can also check “Run additional code on request result” which means that once there is a response, the Javascript code that you place will be executed.
For example, if you need to export a parameter from one step to another, or between test cases you’d write:
- Javascript: “exports.deckId = responseBody.deck_id;”
- In other words: Export the value of “deck_id” in the body of the response obtained in the “deckId” variable.
This feature allows you to integrate and automate different flows combining API and Frontend Automation testing with almost no programming skills.
Test Organization
Inside Testim, organizing your test cases is very intuitive and straightforward, requiring just a few steps. For this purpose, the tool provides different levels of organization as needed such as Test Suite and Test Plan and you can create custom labels.
Creating a test suite is very simple. Once you have the tests that you want to add, just do the following:
- Select “SUITE”
- Click on “CREATE NEW”
- A pop up appears where you can assign:
- Name
- Description
- Select all test cases by title of each
- Click “OK”
The test suite will be loaded and listed along with any other suites you may have under the “SUITES” option.
Reusing Test Cases
Regarding the reuse of test cases, Testim also makes it simple, since you can duplicate and reuse them any time using a simple copy-paste, either the entire case, a module or a single step. Going forward, you can also define it quickly, upon creating a new test case, you can perform the following action:
- Click on the “+” symbol to display a list of options for actions to be carried out.
- At the bottom, you’ll see the titles of previous test cases and you can select one of them to reuse
Remember that when importing a test case, it should not conflict with subsequent steps, so it can be performed for all test cases, despite its purpose.
Testim vs Other Tools
As a result of our experience with Testim, we find some remarkable aspects to weigh their benefits against other automation tools that we also love. I must point out that the tools in this comparison are only at a native level, especially Selenium Webdriver used with Java, Ruby or some other supported programming language.
Below we’ve listed some different test automation tools and compared them on relevant aspects to show some of their advantages, limitations and requirements (there is no best option here, it only depends on what you’re looking for):

Now let’s compare it with some API testing tools:
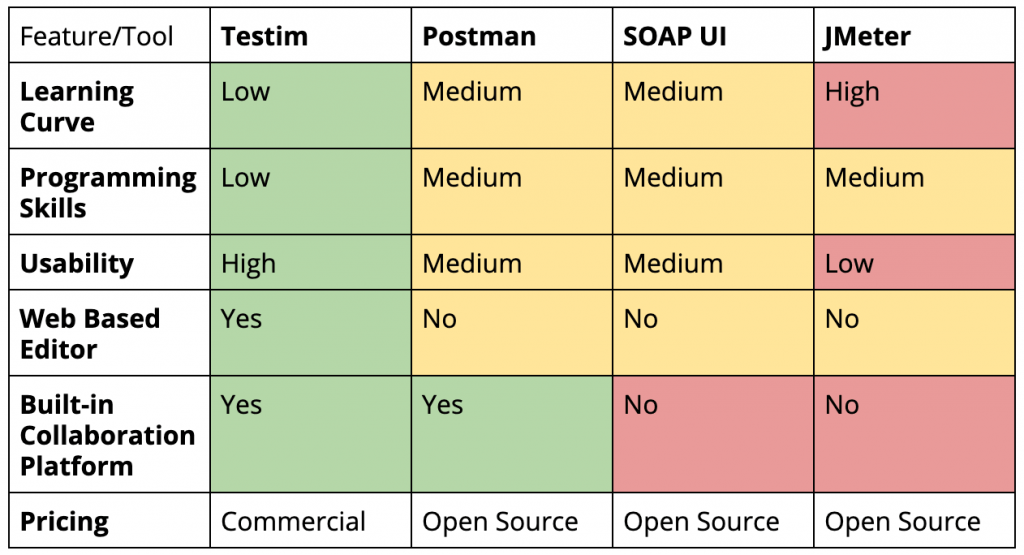
*It is important to comment that this last evaluation is regarding the usability side for those who aren’t familiar with API testing, also Testim, in this case, has its own limitations compared to the others tools that are specifically designed for API testing.
Final Thoughts on Testim
We’re positive that Testim is a really good option that’s worth taking a look at even if you already have experience with test automation. It can help you simplify web automation and take it to another level. The speed with which you can make reliable tests with no knowledge of CSS or XPath is truly impressive. You can see this in its use of smart locators and being the first of its kind, also having the possibility to integrate API testing into the suite.
When it comes to technical debt (a stubborn foe for almost every automation project), the amount of it could be reduced in real terms with Testim. This is partly due to the fact that it’s a tool that anyone on the team can start using (regardless of experience) and its low learning curve. This is a great tool to help create a better DevOps culture and collaborate within a single web platform.
Last but not least, I feel that the basics that we covered today in this Testim review are just the tip of the iceberg and once you get more involved with the platform, you’ll discover it has a lot more benefits, mainly related to the many integrations it has with the Dev Kit, CLI, execution grids and external DevOps tools.
Have you given Testim a try? I’d love to know what you think! Leave a comment.
Recommended for You
Automatic Checks with Scriptless Tool, Ghost Inspector
Software Testing Tools We’re Watching Out For in 2020