Our step by step guide for using Jenkins in a GeneXus project
In this post, we will guide you on how to achieve basic Continuous Integration using Jenkins in a GeneXus project. This is a fundamental step for improving your productivity and development process (even if you are working in a Waterfall approach). By giving early feedback to developers regarding code status, every single one of them will know after committing their code if it doesn’t break the “consolidated” environment and also that it builds successfully outside their own environment.
Only after implementing Continuous Integration, you may be inspired to add some new automation pieces into this process to boost quality and productivity by achieving Continuous Delivery.
Introduction
Let’s assume that your Jenkins will also be used as your “Build Server”, which means that the same machine that will host your Jenkins will be responsible for:
- Getting the latest version of your KB.
- Building the KB (generation + compilation).
- Notifying build status if it fails.
- Deploying the binaries in the local application server.
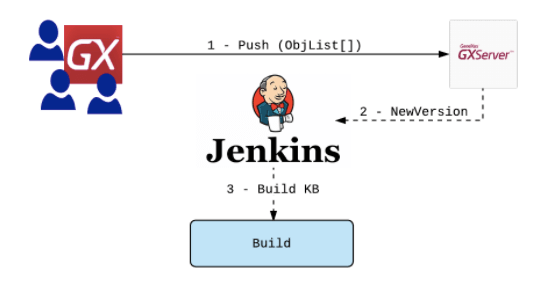
In order to integrate code, we need an SCM. The GeneXus SCM is GXServer, so you can’t achieve Continuous Integration if you don’t have GXServer.
Prerequisites
- GXServer: URL and credentials (username and password)
- A “GeneXus IDE” environment (Windows + SQL Server + .NET Framework) with a valid license key (for the building stage).
- Jenkins for Windows installed.
- The software base to build your KB (e.g. JDK if your apps need Java compiler)
Getting Started
In order to accomplish this, we will be using an example in GXServer Sandbox.
http://sandbox.genexusserver.com/v15/main.aspx
We have a KB called UnitTest2 for this example.
Step 1 (~30 mins)
> Check out your KB from GXServer and build it manually.
- From GeneXus IDE, click File / New / KB from GXServer.
- Put the Server KB URL and credentials, (you will also need this data to be set in a configuration file in step 2.4).
- Type the path where you want to save the local copy of the KB (to build).
After creating your KB, build all from GeneXus. This step will force you to define the Database name, Server name and credentials to create database tables, which is recommended before setting things up in Jenkins (or any CI tool). As a result of this step, you should have a built KB in your local directory (in this guide we will be using the local KB folder set on C:\Models\KBExample)
These steps end when GeneXus IDE shows you the “Build All Success“ message.
Step 2 (~ 1 hour)
Build your KB using MSBuild tasks.
2.1 Check if your environment variable GX_PROGRAM_DIR is correctly set up.
You can see if this is already set by typing in your windows console (cmd.exe)
> echo %GX_PROGRAM_DIR%
The output should look something like: C:\Program Files\GeneXus\GeneXus15
If not, you need to set it up to your GeneXus installation folder.
2.2 – Download GeneXus MSBuild tasks.
. Artech.Samples.GXServerExtraTasks.targets
. Artech.Samples.GXserverExtraTasks.dll
Copy both files into your %GX_PROGRAM_DIR%
2.3 – Set MSbuild Path
MSbuild is the default mechanism to launch the build process in Microsoft Windows, so, for this step you need to put MSBuild.exe path in your command line, e.g. C:\Windows\Microsoft.NET\Framework\v4.0.30319\
If your setup is right, you can just type “msbuild” (plus Enter) in Windows console and see if MSBuild command is recognized.
2.4 – Download your build files (MSBuild scripts).
Create a new folder (e.g. c:\msbuildtasks) and put your build scripts there (one for updating the KB from the server and another for building the KB). You can download examples from here:
. buildKB.msbuild (to build the KB)
. TeamDev.msbuild (to update from GXServer)
Edit both files with any text editor and adjust the GeneXus installation folder path, your KB path, and GXServer URL and credentials.
Open your command line and type:
> msbuild “c:\msbuildtasks\buildKB.msbuild”
You should see how your KB is building. Please note that this is the same as doing “Build All” using GeneXus IDE, but from a Windows MSBuild process. “TeamDev.msbuild” script will be used in the next step…
Step 3 (~ 30 minutes)
Get KB latest version from GXserver using MSBuild tasks.
3.1 Start by downloading GXServer client (in order to connect to GXServer using MSBuild tasks). This is needed by MSBuild script to handle communication with the server. To do so, create a local directory in your machine (e.g. c:\gxserverclient).
Download these 2 files and copy them into it:
If you already edited your TeamDev.msbuild file in previous step (2.4) pointing to your folders, then you will be able to open your command line and type:
> msbuild “c:\msbuildtasks\TeamDev.msbuild”
You should now be seeing how the KB is being updated from GXServer (if it has new changes from the last update).
Step 4 (~ 1 hour)
Integrate it in Jenkins
4.1 First, you need to install 2 plugins in Jenkins, one for triggering MSBuild tasks (step 2 and 3), and another to see them in a “pipeline” style:
In Jenkins, click Manage Jenkins / Manage Plugins.
Look for these 2 plugins and install them:
- Msbuild Plugin
- Pipeline
4.2 Then, you will need to create 2 Jobs:
Job #1: UPDATE KB:
Click on “New Item” select “Freestyle project” and set the job’s name (something like “Update from GXServer”). Click Ok. Then navigate to “Build” section and “Add build step” by choosing the “Build a Visual Studio project or solution using MSBuild”.
Over the text field “MSbuild Build File” just put your script (c:\msbuildtasks\TeamDev.msbuild).
Job #2: BUILD KB:
The other job is for building, so again:
Click on “New Item” select “Freestyle project” and put an item name like “Build KB”. Click Ok. Then navigate to the “Build” section and “Add build step” by choosing the “Build a Visual Studio project or solution using MSBuild”.
Over the text field “MSbuild Build File” just put your script (c:\msbuildtasks\buildKB.msbuild)
Finally, on the “Post-build Actions” section, add a “Build other projects” action to automatically trigger the build after the update from GXServer (Continuous Integration).
This can be achieved by typing the name of your first task (job name “Update from GXServer”).
4.3 Create the pipeline
Now, you can create the pipeline. On your Jenkins dashboard, click the (+) icon, and add a “Build Pipeline View” and select a name for your pipeline (e.g. “demo KB”).
In the “Select Initial Job” field, choose the first one to run: “Update from GXSever” job.
Your pipeline should look like:
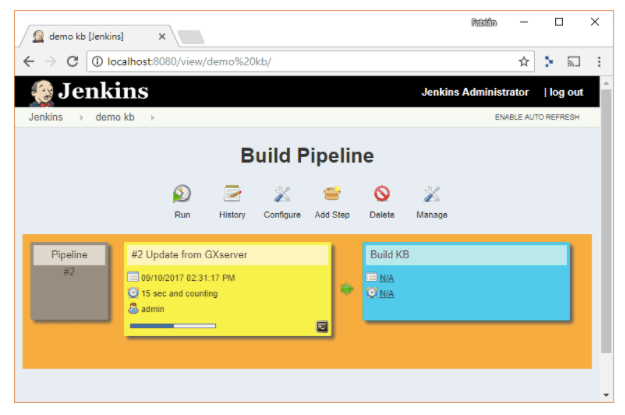
You can now simply run the pipeline in Jenkins and see the output.
If you have problems with this step, check Windows’ user privileges running your Jenkins service and ensure that it has proper access to folders and executables involved so far.
And there you have it!
If you want to set-up a different CI tool (like Bamboo, Circle CI, TeamCity, etc. ) OR, if you want to set up a more sophisticated approach (using building slaves, deploying to the cloud, etc.), just leave us a message!
Recommended for You
Not Convinced Yet About “Shift-Left Testing”?
How to Use Monkop for Continuous Mobile Testing