With the new version of the famous frontend automation tool made available, some novelties have surfaced and automation testers are more than keen to try them out. We will take a look at them to see exactly what has been introduced in this brand new version.
What is new?
Complete switch to the W3C WebDriver Protocol from the legacy JSON Wire Protocol (JWP) that had been used in Selenium 3. In the new version JWP is no longer supported, but backward compatibility is in place, through Java bindings provided, so tests running in version 3 of Selenium won’t break. That being said, under version 4 the communication between WebDriver and the browsers will be more stable, effective and consistent as they will share the same protocol, and no encoding or decoding will be needed to communicate through JWP. By the same token no more browser-specific tweaks are necessary to make it work in different browsers, as WebDriver is becoming W3C standardized. This also means that the Actions API has been revamped completely now conforming with the WebDriver Spec, though most of its modifications are internally used. In some cases the protocol shift may suppose a change in the name used in the capabilities such as the browser version which in JWP is described as version would become browserVersion in W3C.
In short, switching over to W3C is a very beneficial change, mainly because all modern browsers use this protocol, so no more worrying about issues when porting tests from one browser to another, or adding complexity through JWP. As a result, less flakiness, more consistency and stable automated tests are expected to manifest during execution. .
Enhanced feature to build a Selenium instance driver using the RemoteWebDriver builder method along with the adequate options for the intended browser (ChromeOptions, FirefoxOptions, etc). It is possible to include an address in case the intention is to connect the driver to a Grid server.
Deprecations such as time signatures for waits and timeouts, now using Duration class, and deleted FindsBy* methods which in place have findElements with a By instance passed in as parameter.
Relative locators: Now it is possible to find elements which are relative to the position of others. Depending on which side, from the element under question, we are looking for those other close elements, so it could be from the right, the left, above, below or simply near the one which has been already found.
The relative location of an element is based on what is known as the client bounding rect which every element has and contains the information of the dimensions and position of the element, this way it knows exactly where it is located and where its edges are. Selenium 4 measures the distance from the edge of the element towards the intended direction, for example the bottom edge if we want to search in the below direction. The searched elements are returned according to the proximity to the relative element.
What are its limitations? Due to the way it’s implemented it could happen that elements that should be found sometimes aren’t. A good example of this is when we can find an element with a certain screen resolution, but then when we try to do so in another (maybe through running a remote Webdriver in another machine) the page layout might be different, which would cause the client bounding rects to not line up as previously, therefore not finding the elements.
Register credentials easily through HasAuthentication class where we can store a set to use every time a user and password is needed or a set that matches against a predicate. These credentials are useful when we encounter basic or digest authentication. Prior to this method, in Selenium 3, the way to do it was through setting a login cookie in the session before accessing the site.
Intercepting requests: sometimes the tests could seem flaky due to an unstable backend. Selenium 4 allows us to intercept the HTTP requests that the browser makes and even replace the resource requested with one from our own, such as an image for instance. What needs to be done is create a Network Interceptor with the driver and the route of the resource we want to replace.
Chrome Debugging Protocol: many of the features of Selenium 4 are based on this protocol and it is used by chromium browsers for their debuggers. It is really insightful into the browser inner workings, therefore, this can be useful for testing. It can be accessed through the HasDevTools API and fortunately Selenium can speak multiple versions of this protocol so it can be used with different versions of a chromium-based browser. Selenium acts as a wrapper on the CDP API to send commands to the protocol and invoke the Chrome DevTools features.
In this way we can try different scenarios such as:
- Adding a network latency to the tests
- Switching to another geolocation with latitude, longitude and accuracy parameters
- Changing device screen dimensions
- Blocking certain resources from loading such as images for faster tests
- Print JavaScript errors appearing in the console
Selenium Grid
The Selenium Grid has been rebuilt to include different modes. While the classic Hub and Node is available, the server introduces two new setups, let’s look at every single one of them
Hub and Node: Starting a hub server and then connecting the nodes with their setup
Standalone: the server listening on http://localhost:4444/ rather than http://localhost:4444/wd/hub, and it is there that the Remote WebDrivers should point to. By default it will look for any drivers it can use by looking at the PATH.
Fully distributed: In this mode the hub has been revamped into multiple components, each in its own process. It has been created with the thought of modern infrastructure (Kubernetes). The processes are as follows and in the order they must be executed:
- Event Bus – through here the node registers to the distributor
- Session Map – stores the session ID and the node where the session is running, this info is sent to it by the Distributor
- New Session Queue – Holds all the new session requests in FIFO order
- Distributor – Watches all nodes to check for availability, if there is a matching request from the Session Queue it attaches it to the Node
- Router – Gateway to the grid, connects clients to nodes. If it is a new session request it is added to the queue
The new Grid now has integrated support for distributed tracing into it using OpenTelemetry. It helps in revealing the internal states of the system using traces, metrics, and logs, this way it’s possible to know what is going on exactly. An open-source tool to monitor transactions, called Jaeger UI, helps in visualizing these traces. The Grid is now easier to manage and the data can be queried from a GraphQL model to create custom visualizations in order to monitor it.
Last but not least it’s worth mentioning that with the release of Selenium 4 the Selenium IDE has been brought back as a web-extensions based plugin available in Chrome and Firefox browsers, and with a brand new UI. Not only is it possible to export code for different languages, it also can create new commands, and plugins can be shipped as extensions, for instance Applitools for Selenium IDE for codeless visual testing. Additionally, The stability of the tests has been improved by including backup selectors, with different strategies, to fall back in case the main locators fail, and also conditions such as while or if can be included by the tester.
From theory to practice
We decided to try these brand new features in a Page object model based framework, made from scratch using Selenium 4 for Java (JDK 14), TestNG, Maven, and WebdriverManager. For the purpose of this demo, we will be using the Abstracta opencart website.
First of all, as mentioned before there is a new way to create a driver, by using the RemoteWebDriver builder, the difference comes in which capabilities is passed as parameter, so in this case we will be using ChromeOptions to indicate the Chrome browser.
driver = RemoteWebDriver.builder().oneOf(new ChromeOptions()).build();Additionally we could specify other details such as running the browser headless or indicating a grid address, but we won’t be going into that right now.
Relative Locators
To try this feature the plan was to head out to the all laptops section and find different products on the laptops list.

The supplied product names are brought by a data provider, called by the test, in which names such as MacBook or Sony VAIO are provided. The first step is to find the first tag h2, that appears above the laptops main image and highlight it, in the following way:
WebElement titleLaptops = driver.findElement(RelativeLocator.with(By.tagName("h2")).above(laptops.getPageLoadedLocator()));
WebDriverUtils.highlight(titleLaptops, driver);
Let’s not forget that the direction method can support a locator as well as an element already found.

This step will always be successful as this is a simple one, however in the next ones let’s introduce a different scenario.
What if we wanted to select the Add to cart button for a specific product, can the relative locators help us with that task?
// Find the right product
WebElement desiredProduct = driver.findElement(By.linkText(productName));
With the element found by its link text in the previous line (MacBook), what’s next is finding the button in the different directions it could appear. As you have seen from the previous picture the button is located right below the product name, so we’ll find every single product located below it and see what happens.
// Below
List<WebElement> aux_list = driver.findElements(RelativeLocator.with(laptops.spanAddToCart).below(desiredProduct));
Not only could we find the desired button, but all others that stood right below the line where the product name is located, making for a total of 5 buttons. Given that they were found in order of proximity to the related element, the first one found was the one intended.
The next tries would be done finding the elements above, near (with an adjusted distance in pixels to 200 as the default is 100), left of, and right of the product name, so the quantity of elements given the different directions and browser modes were as follows:
| Chromedriver 97 | Graphic Browser | Headless |
| Below | 5 Shopping carts | 0 Shopping carts |
| Above | 0 Shopping carts | 5 Shopping carts |
| Near | 2 Shopping carts | 0 Shopping carts |
| Left | 2 Shopping carts | 5 Shopping carts |
| Right | 1 Shopping carts | 0 Shopping carts |
Just as the feature’s limitations were forewarned, when the DOM structure or the resolution changes, the elements may or may not be found in the same way again.
In the end Relative Locators are a fine addition to the Selenium functionalities as they are a useful approach when we want an element in a certain direction from another, however they might need a few improvements to deal with its limitations or with the example provided previously. In the latter case, there is always another solution, which is in turn finding the element through XPath navigation, from the specific name to the container element and then to the specific button related. The next selector displays this way to do it:
"//a[normalize-space()='MacBook']//ancestor::div[@class='product-thumb']//button[contains(@onclick,'cart')]/span"Authentication
We can register credentials for a specific domain, or for common use with the following statements:
Predicate<URI> uriPredicate = uri -> uri.getHost().contains("the-internet.herokuapp.com");
((HasAuthentication) driver).register(uriPredicate,() -> new UsernameAndPassword("admin","admin"));
In the latter case there is no need to register a predicate as the first parameter, with just the credential set it will do. No matter if it is Digest or Basic authentication, it will do the trick.
The website this time will be the-internet-herokuapp website made to try different web functionalities.
Network Interceptor
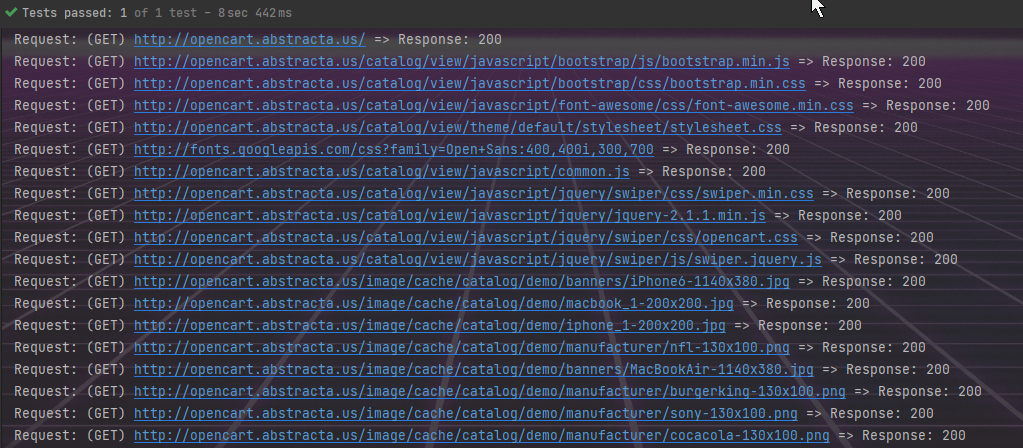
In this case, two different test cases were tried with the NetworkInterceptor class, one for showing in the console every single request with its status code, in which a filter that uses an HttpHandler was passed in the Interceptor declaration, and this was the result:
And another one in which a Routable is passed in the Interceptor, that checks for a specific image request and replaces it by one stored in the project, so that a different resource is loaded. For this demo, the images in the main slider will be replaced by a wallpaper.
While the Interceptor could become handy in certain situations, no examples were found to block resources instead of just replacing them, which would be far more useful for specific scenarios where some of those resources might be taking too long to load. This leads us to the next use cases in which it is possible to do such an action.
DevTools
It is necessary to point out that not all browser drivers have the DevTools features as this is a Chromium exclusive, however Firefox seems to have it implemented as well, and needless to say it is, Opera and IE drivers are out of the question. Nonetheless, with the right driver it is possible to access a wide range of different of uses, of which we’ve tried a few ones such as:
- Block requested resources
- Simulate Network conditions (different speeds or no connection at all)
- Show DevTools console logs
- Emulate Location Coordinates
First of all in this specific test, what we need to do is have a DevTools type variable which we will initialize for every test in this class by using the getDevTools() and createSession methods. Notice how in my case I had to cast my driver to ChromeDriver type to call these methods, as in my BaseTest I had it defined as a WebDriver.
private DevTools devTools = null;
@BeforeMethod
public void setDevTools(){
    devTools = ((ChromeDriver)driver).getDevTools();
    devTools.createSession();
}
1- Block Requests
In this case we are going to block all loaded JPG and PNG images as well as style-sheets, and see how it looks after doing a refresh.
devTools.send(Network.enable(Optional.empty(),Optional.empty(),Optional.empty()));
List<String> blockedExtensions = ImmutableList.of("*.jpg","*.png","*.css");
// Block requested resources with a certain extension
devTools.send(Network.setBlockedURLs(blockedExtensions));
2- Simulate Network Conditions
In these cases we are first going to set the connection to offline and then simulate a slow network.
In the next lines the parameters are as follows: offline status, minimum latency in ms, maximum download throughput, maximum upload throughput and connection type.
devTools.send(Network.emulateNetworkConditions(true,
        0,
        0,
        0,
        Optional.of(ConnectionType.CELLULAR3G)));
In this case as we are setting offline mode, it is pointless to set the other parameters.
Moving to the other scenario, we’re going to compare a normal page load with one made with different settings, so let’s set a high download throughput and upload throughput, but high latency as well to see how it goes.
devTools.send(Network.enable(Optional.empty(),Optional.empty(),Optional.empty()));
devTools.send(Network.emulateNetworkConditions(
   false,
   10000,
   50000,
   50000,
    Optional.of(ConnectionType.CELLULAR3G)
));
// Timing for slow network
long startTimeSlow = System.currentTimeMillis();
driver.get("https://duckduckgo.com/");
long endTimeSlow = System.currentTimeMillis();
System.out.println("Slow page loading under " + (endTimeSlow - startTimeSlow) + " milliseconds");
After running this code: Slow page loading under 37788 milliseconds
After commenting out the Network simulation: Normal page loading under 903 milliseconds
In the slow loading we can see that it took 38 seconds to load, while the normal one was barely a second
This is a useful way to try and see how a website reacts to a slow connection with different types such as 2G, 3G, Ethernet, etc, or no connection at all.
3- Console Logs
Through the logs we can have more information about the current status of the website and to be able to see them displayed it is necessary to enable them first and then add a listener in which we can handle that data.Notice that we’ll head to a “the-internet” page this time where there isn’t much content to show.
// Enable logs
devTools.send(Log.enable());
// Listener for logs
devTools.addListener(Log.entryAdded(), logEntry -> {
    System.out.println("================");
    System.out.println("Log: " + logEntry.toString());
    System.out.println("Source: " + logEntry.getSource());
    System.out.println("Text: " + logEntry.getText());
    System.out.println("Timestamp: " + logEntry.getTimestamp());
    System.out.println("Level: " + logEntry.getLevel());
    System.out.println("URL: " + logEntry.getUrl());
});
// Load page with console logs and wait
driver.get("http://the-internet.herokuapp.com/portfolio/");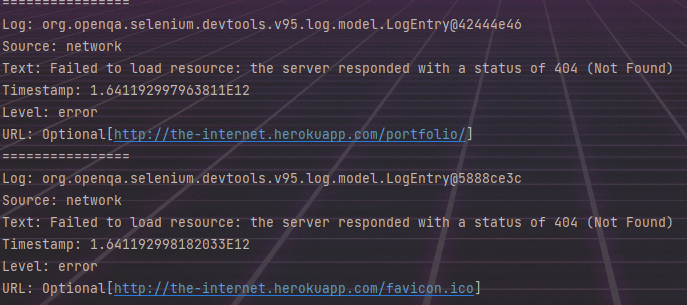
4- Emulate Geolocation
This time around we’re going to simulate as if we were on another location changing the latitude and longitude as they are sent in the setGeolocationOverride method. To do so we’re going to load a website called https://where-am-i.org/ which shows the location coordinates, and then after the emulation is set in place, reload the site to show the new ones.
driver.get("https://where-am-i.org/");
double latitude = 64.128288, longitude = -21.827774;
// Send in new location coordinates
devTools.send(Emulation.setGeolocationOverride(
        Optional.of(latitude),
        Optional.of(longitude),
        Optional.of(1)));
WebDriverUtils.ExplicitWaitElement(ExpectedConditions.visibilityOfElementLocated(marker),Constants.SHORT_TIMEOUT,driver);
WebDriverUtils.MoveToElement(marker,driver);
WebDriverUtils.highlight(driver.findElement(map),driver);
// Reload page
driver.navigate().refresh();
WebDriverUtils.ExplicitWaitElement(ExpectedConditions.visibilityOfElementLocated(marker),Constants.SHORT_TIMEOUT,driver);
WebDriverUtils.MoveToElement(marker,driver);
WebDriverUtils.highlight(driver.findElement(map),driver);
WebDriverUtils.highlight(driver.findElement(lat),driver);
WebDriverUtils.highlight(driver.findElement(longt),driver);
Assert.assertEquals(driver.findElement(lat).getText(),String.valueOf(latitude));
Assert.assertEquals(driver.findElement(longt).getText(),String.valueOf(longitude));
As the video shows, the coordinates are successfully emulated, changing the location from Uruguay to Iceland!
Summary
In short, it is safe to say that Selenium 4 comes with a set of relevant features that can truly add up to the range of possibilities in the automation testing world, however while some of them might not be suitable for all circumstances, some are powerful enough to allow us to control browser settings to simulate certain conditions that wouldn’t be possible before. From my perspective, the one that stands out is clearly the Chrome DevTools, as its potential to enhance tests makes Selenium mightier than it ever was.
Read more about it:
Follow us on Linkedin, Facebook, Twitter, and Instagram to be part of our community!